Wednesday, April 1, 2015
Friday, August 8, 2014
Search and Rescue Radio in a box
Arlene is a member of the Incident Support Team (IST) for King County Search and Rescue (KCSAR). She recently decided to purchase the standard KCSAR radio, which is a Kenwood TK-780. Initially, she didn't want it permanently installed in her Toyota pickup, so I suggested putting it in a small box. Apparently, I must really like building radio-in-a-box setups because below you will find photos of the end result.
Before that here are some of the details that went into making the project. Total build time approximately 60 minutes, except for the travel time to Harbor Freight where I purchase a small "aluminum" case on sale for just over $11 (always use your coupons!). It has only an aluminum frame. The black portions between the frame members are made of a fiberboard that comes very close to a highly compressed cardboard. Yet, they advertise this as an aluminum case.
Case measures 7 1/2 by 11 1/2 by 4 1/2 outside dimensions. Inside dimensions are 6 3/4 by 11 by 4 1/8.
Granted this isn't very big, but Arlene's request was to make it small enough to easily carry and store anywhere in her pickup. I believe that was accomplished, because it is in fact "Arlene Approved".
The weight needed to be light and to that end the entire setup weighs a mere 5 pounds, 6.5 ounces. Optionally, there is enough room to include a direct connected 12 volt 7 AH battery, however this would nearly double the weight since the battery weighs 5 pounds, 4.4 ounces. Although Arlene tested the "carry" of this option and said this would not be a problem for her, if needed.
A small aluminum bracket was used to raise the radio enough so it could be angled to make the display easily readable and the microphone jack is above the box edge. The bracket was from an old tower PC, it was a 5 1/4 inch drive bay filler. This came out of my projects junk box, so it was free. The bracket is pop-riveted to the bottom of the case. The radio included a mobile bracket, which was then screwed to the aluminum bracket. That was the entire construction process.
Radio is attached to the mobile bracket, power and chassis ground cables were routed so can be used with the power accessory plug and chassis ground connection installed in the pickup, respectively.
The setup for in pickup operation is as follows:
- Open box, drag out the antenna pigtail, Anderson Powerpole connectors for power and chassis ground
- Attach antenna, power and ground wires already in pickup to the matching box items
- Turn on pickup and then radio
- Listen and talk!
The photos below can be enlarged with a click. Purchased items were Harbor Freight case, KCSAR radio, Anderson Power Poles and battery (from earlier project). Recycled part was the aluminum bracket.
 |
| View from handle side, standing on hinged side. |
 |
| View with box on base. |
 |
| Opened box with basic setup. |
 |
| Cables shown are VHF antenna pigtail, fused power lead, chassis ground and microphone. |
 |
| Optional battery is inserted to the right of the radio. |
 |
| Packed for case closure, with optional battery. |
Saturday, May 10, 2014
Power your laptop from your radio Go-Box battery!
First off, I am not any kind of electrical expert. However, that never stopped me from experimenting.
Granted fuses fear me when I come near, but if you know someone who is skilled with electrical knowledge then you have every reason to give your ideas a path to reality.
Well, Jim, K7JGM gave me a new idea for my Packet Go-Box. He mentioned that his Go-Box contained a Powerpole outlet to power his laptop computer. This means that it is possible to tap the 12 volt power supply for the radio to power a laptop. You just need a way to step up the 12V to something like 18 to 19 volts. The specific output voltage depends on which laptop you own. In my case the Toshiba laptop I have dedicated to my packet station needs 19 volts. I obtained this information from the power brick included with the laptop. The power brick tag says output is 19 volts and 3.95 amps. Being the trusting person that I am, I measured the voltage coming out of the brick and it read 19.6 volts. Close enough.
 The voltage step up is done by using a DROK DC Converter Voltage Regulator 8-32V to 9-46V 12/24V 150W Boost Step Up Power Supply Module which is available from amazon.com The regulator can be adjusted easily to match your output needs. However, be sure the output range of the regulator is appropriate for your particular laptop.
 For your Go-Box, you simply tap the 12 volts and install a Powerpole outlet somewhere accessible for you laptop. In my case, I already had a Go-Box built with 12 volt Powerpole outlet so, I decided to make an external 19V converter. Below you should see the convertor installed in a plastic "case" with Powerpole connectors on both input and output.
The case for the converter is a $1 plastic box from the stationary section at our local Fred Meyer. Several holes were cut in the case to allow the Powerpole wires to enter the box and to allow the cooling fins to be exposed.


Finally 5 small holes were drilled to allow access to the screws which secure the wires AND the voltage adjust screw.
 Lastly, the scary part is cutting the wire on the power brick that goes to the laptop. This way you can install Powerpole connectors on each side of your cut, as shown here. This allows you to connect the laptop's power connector to either its original power brick OR the new converter you just assembled. That's it, enjoy!


UPDATE (2014-05-10) :
So, you have a Dell laptop and it has a "smart" power brick. Well guess what! Instead of having the typical 2 connector power port, it has a 3 connector setup. That center pin is a way for your laptop to tell if the power brick is the correct one. Unfortunately, if it thinks the charger isn't the correct one, then it allows it to power the laptop but not charge the battery, even if it has the correct voltage. Some folks in the various forums have suggested to just send the 19 volts down the center connector as well, but don't do it. That connector expects no more than 4 volts so more then that may kill the "smart" chip. See http://kakopa.com/Dell_PS/index.html for some background.
 However, all that said it is possible to use the converter with a Dell. Since I have a great appreciation for Anderson Powerpoles that is what I used to make sure everything connects correctly. The images show how to wire the connectors to use all three wires when the power brick is connected and how the converter connects. Note that the Center Pin is labeled for photo reference, since the Powerpoles are used there is only one way to actually connect everything. Red goes to the + 19 V connector which is the inner shield. One black goes to the ground outer shield and the other black (sorry I didn't have another color, which they do make) goes to the center pin.
 Everything works as usual when connected to the power brick. However, when the converter is connected the laptop whines about it being the wrong charger and it won't allow battery charging. How rude! If you leave this situation alone then the battery slowly discharges. You probably won't notice it because the converter is powering the laptop. The issue occurs when you disconnect the converter and expect the battery to power the laptop. If the battery has fully discharged, well you guessed it, the laptop goes black when converter is unplugged.
An extremely simple solution is to remove the battery after the converter is plugged in. The only change with the battery removed is that the converter's fins warm up just a bit more than with the battery inserted.
If someone knows a way to fool the laptop into believing it has the correct power brick, please let me know.
Granted fuses fear me when I come near, but if you know someone who is skilled with electrical knowledge then you have every reason to give your ideas a path to reality.
Well, Jim, K7JGM gave me a new idea for my Packet Go-Box. He mentioned that his Go-Box contained a Powerpole outlet to power his laptop computer. This means that it is possible to tap the 12 volt power supply for the radio to power a laptop. You just need a way to step up the 12V to something like 18 to 19 volts. The specific output voltage depends on which laptop you own. In my case the Toshiba laptop I have dedicated to my packet station needs 19 volts. I obtained this information from the power brick included with the laptop. The power brick tag says output is 19 volts and 3.95 amps. Being the trusting person that I am, I measured the voltage coming out of the brick and it read 19.6 volts. Close enough.
The voltage step up is done by using a DROK DC Converter Voltage Regulator 8-32V to 9-46V 12/24V 150W Boost Step Up Power Supply Module which is available from amazon.com The regulator can be adjusted easily to match your output needs. However, be sure the output range of the regulator is appropriate for your particular laptop.Finally 5 small holes were drilled to allow access to the screws which secure the wires AND the voltage adjust screw.
Lastly, the scary part is cutting the wire on the power brick that goes to the laptop. This way you can install Powerpole connectors on each side of your cut, as shown here. This allows you to connect the laptop's power connector to either its original power brick OR the new converter you just assembled. That's it, enjoy!UPDATE (2014-05-10) :
So, you have a Dell laptop and it has a "smart" power brick. Well guess what! Instead of having the typical 2 connector power port, it has a 3 connector setup. That center pin is a way for your laptop to tell if the power brick is the correct one. Unfortunately, if it thinks the charger isn't the correct one, then it allows it to power the laptop but not charge the battery, even if it has the correct voltage. Some folks in the various forums have suggested to just send the 19 volts down the center connector as well, but don't do it. That connector expects no more than 4 volts so more then that may kill the "smart" chip. See http://kakopa.com/Dell_PS/index.html for some background.
However, all that said it is possible to use the converter with a Dell. Since I have a great appreciation for Anderson Powerpoles that is what I used to make sure everything connects correctly. The images show how to wire the connectors to use all three wires when the power brick is connected and how the converter connects. Note that the Center Pin is labeled for photo reference, since the Powerpoles are used there is only one way to actually connect everything. Red goes to the + 19 V connector which is the inner shield. One black goes to the ground outer shield and the other black (sorry I didn't have another color, which they do make) goes to the center pin.Everything works as usual when connected to the power brick. However, when the converter is connected the laptop whines about it being the wrong charger and it won't allow battery charging. How rude! If you leave this situation alone then the battery slowly discharges. You probably won't notice it because the converter is powering the laptop. The issue occurs when you disconnect the converter and expect the battery to power the laptop. If the battery has fully discharged, well you guessed it, the laptop goes black when converter is unplugged. An extremely simple solution is to remove the battery after the converter is plugged in. The only change with the battery removed is that the converter's fins warm up just a bit more than with the battery inserted.
If someone knows a way to fool the laptop into believing it has the correct power brick, please let me know.
Tuesday, December 17, 2013
RMS Express installation improved by using AGW Express Interface-Solution Set
Quite some time back I decided to use my amateur radio to send and receive packet messages, so I carefully researched what I needed, which included:
Hardware - 2 meter capable amateur radio; antenna; computer and interface between computer and radio AND of course "some" software.
Back then it was, to say the least, a challenge to get find everything you needed then get it all installed, configured and running correctly.
Not so now!
Now, you can go over W2YG's Software web site and download AGW Express Interface - Solution Set which will assist you in installing and configuring all the software parts needed to send and receive packet messages. BTW, it also covers HF messages as well, but I won't touch on that here.
Here is my list of parts:
Procedure for setup:
Hardware - 2 meter capable amateur radio; antenna; computer and interface between computer and radio AND of course "some" software.
Back then it was, to say the least, a challenge to get find everything you needed then get it all installed, configured and running correctly.
Not so now!
Now, you can go over W2YG's Software web site and download AGW Express Interface - Solution Set which will assist you in installing and configuring all the software parts needed to send and receive packet messages. BTW, it also covers HF messages as well, but I won't touch on that here.
Here is my list of parts:
- Yaesu FT-897D
- SignaLink with appropriate cabling and jumpers
- Old Dell laptop (running Windows 7)
Procedure for setup:
- I will assume that you followed the directions to install the SignaLink. If not, finish those steps using the Tigertronics web site instructions.
- You now have the USB cable coming from the SignaLink and the SignaLink's other cable plugged into your radio. The USB of course gets plugged into your PC.
- Download the AGW Express Interface , also snag the documentation from there as well.
- Run the downloaded file. Follow along with the instructions, carefully. There are a couple of spots where the answers to the installation choices aren't exactly obvious.
- Once the installation is complete, you can run the AGW Express Interface and it will start all the pieces needed and then ask if you want to start RMS Express. Since you installed it as part of the solution set, of course you will start it.
That's all there is! Well, you need to get familiar with RMS Express, but also reasonably straight forward. Just remember there are two parts the main screen and then the piece that does the send and receive. This send/receive is started using the "Open Session" icon which looks like this

Previously, I was using AirMail as the packet client, RMS Express does both VHF/UHF and HF packet, plus it is being actively updated. So it feels like a better choice.
Okay, I lied! There is one more thing you need and I bet you already asked... How do I get a Winlink email address? Check out the How to get a Winlink RADIO e-mail account? It is fairly straight forward, but relies on you having the ability to connect via your radio to an RMS Gateway using your new packet setup. The information and links on this web page will be of immense help. If you can find an local elmer it goes much quicker.
Good luck! If you have questions, feel free to post comments or email me at K7RFH at arrl.net
Other resources:
- RMS Express FAQ
- Installation Of All Solution Components (Open or Save As)
- RMS Express Tutorial
UPDATE: 2013-12-18 AGW Express Interface Version 2 is now available
Sunday, December 15, 2013
Face palm: Why didn't I get a monopod? A DSLR video must, but I use a real camera!
Attended an online seminar which focused on cinematography. Now as everyone knows video has moved to the DSLR realm. Why use those heavy, bulky video camcorders, just doesn't makes sense.
Yea, right!
Nope, I love those big ol' cameras. BUT, never ignore the tools of the trade and experiment with everything!
I recently did a shoot that required handheld capture for long periods. Needless to say by the end, I was quite shaky. Could have hauled around my lighter tripod, but that would have been a bit disruptive in the small theater during the sensitive classical music moments.
Back to the seminar. They talked quite a bit about using a monopod for run and gun action. Their favorite one seemed to be the Manfrotto 561BHDV-1 Fluid Video Monopod and Head. This has proven to work well with the lighter DSLR rigs. Check out one of the reviews. This felt like another opportunity to try something new and solve the shaky cam, wearing out the old guy's shoulder issue. But could this one handle the cameras that I use. The cameras are just too heavy. However, Manfrotto makes another model which can handle triple the weight of the 561BHDV. Since I already own a couple Manfrotto fluid heads, this was an obvious choice.
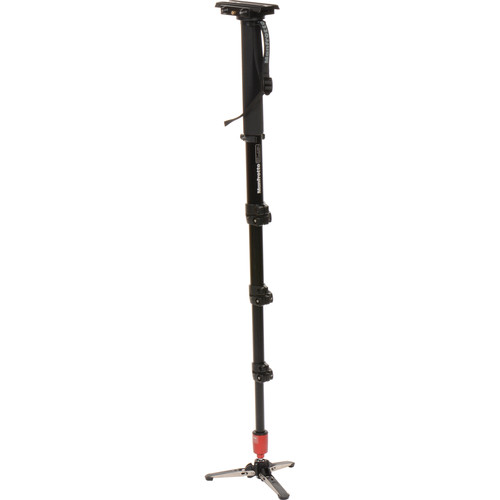
I have had the monopod for a few days now and after experimenting with it, I find that this will solve my exhaustion shaky cam issue. Plus, I now have several new options for shooting. First, the monopod gives you the ability to perform a limited range dolly-style move for a forward and backward motion. Next, it is far taller than my tripods so I can get above the scene and still occupy a large footprint. Finally, this allow a much more run and gun style for me and my big cameras.
Not all is nirvana. Unlike a tripod, you can't just leave it stand while you prep some other aspect of the shoot. It does require some planning to make sure you have everything ready prior to dedicating all of your attention to the monopod.
Also, I am using an old Manfrotto 501HDV Pro Video Head as the topping for the monopod, so I will still need to keep working out to make sure that I can haul this entire rig around easily for long periods of time. But at least now I get to rest a bit during extended shots.
I really like this setup and can't wait to try it out for some actual assignments
Yea, right!
Nope, I love those big ol' cameras. BUT, never ignore the tools of the trade and experiment with everything!
I recently did a shoot that required handheld capture for long periods. Needless to say by the end, I was quite shaky. Could have hauled around my lighter tripod, but that would have been a bit disruptive in the small theater during the sensitive classical music moments.
Back to the seminar. They talked quite a bit about using a monopod for run and gun action. Their favorite one seemed to be the Manfrotto 561BHDV-1 Fluid Video Monopod and Head. This has proven to work well with the lighter DSLR rigs. Check out one of the reviews. This felt like another opportunity to try something new and solve the shaky cam, wearing out the old guy's shoulder issue. But could this one handle the cameras that I use. The cameras are just too heavy. However, Manfrotto makes another model which can handle triple the weight of the 561BHDV. Since I already own a couple Manfrotto fluid heads, this was an obvious choice.
I have had the monopod for a few days now and after experimenting with it, I find that this will solve my exhaustion shaky cam issue. Plus, I now have several new options for shooting. First, the monopod gives you the ability to perform a limited range dolly-style move for a forward and backward motion. Next, it is far taller than my tripods so I can get above the scene and still occupy a large footprint. Finally, this allow a much more run and gun style for me and my big cameras.
Not all is nirvana. Unlike a tripod, you can't just leave it stand while you prep some other aspect of the shoot. It does require some planning to make sure you have everything ready prior to dedicating all of your attention to the monopod.
Also, I am using an old Manfrotto 501HDV Pro Video Head as the topping for the monopod, so I will still need to keep working out to make sure that I can haul this entire rig around easily for long periods of time. But at least now I get to rest a bit during extended shots.
I really like this setup and can't wait to try it out for some actual assignments
Sunday, May 26, 2013
Even more serious about this video thing!
It has been a very long time since I last wrote about anything here at richhand.blogspot.com, well then, I guess it is about time.
First, since my last post in January, 2012 a lot has happened. I am now working full time for the Museum of Flight in the Seattle area. The work involves a lot of event and exhibit creation, preparation and take down. It also includes the best part, which is the video production. My last post noted some new equipment I purchased for personal use. This personal use has expanded to some gigs as a cameraman for Latona Arts and at times the equipment is also used to supplement event captures at the museum as well.
Here in my studio, we (Arlene & I) were using Sony Vegas Studio to create a variety of videos. In the year and a half since the last equipment purchases a lot of skill progress has been made and it is time to make the next leap in equipment and software. Software will remain in the Sony Vegas line, but now going with Vegas Pro and Sound Forge Pro. We will continue to use DVD Architect, but plan to look at possible improvements there as well.

Since the Rode NTG-1 microphone has worked well, it is on the new equipment list again.
Areas that needed improvement are - carrying cases, tripod and camera. The current cases are okay, but through experience, it is clear that the current tripod case is not rugged enough to protect an expensive tripod. With the newest tripod purchase and a replacement for the older case, Handmade Enterprises Video will be purchasing the Hakuba PSTC 300 Extra Large Pro Series Tripod Case. Large enough and padded enough for the various excursion the tripod will endure.
The next case improvement is to secure one large enough for the new camera and all the extra accessories that must tag along to any shoot. The current case fits the Panasonic AG-HMC80, but isn't as durable as I had hoped. Nothing new for the AG-HMC80, but for the new camera I will purchase the B&H recommended case. The Pearstone Professional Soft Camcorder Case with Wheels is the choice. This is a little bit of overkill, but provides ample protection and interior room for camera and many of the accessories that must follow me around. This eliminates the need for many of the secondary cases I was hauling. The wheeled nature of the case now means that I arrive with tripod on the shoulder while pulling the camera case and that's it. Sometimes I still need to bring a cart for a full setup, where a full setup means adding cables, microphones, mixer, recorder and monitor, plus sometimes a lighting kit. May still need a roadie when that happens.
 What holds up your cameras is often as important as the cameras themselves. Previous tripod purchase was the Manfrotto 055XDB Tripod (Black) with 501HDV Head. A very nice tripod for use where having the camera up high (to shoot over the audience's heads) and staying in one location (such as setup on stage or in venues where moving the camera would be too much of a distraction) is the order of the day. It is heavy enough to be stable and with the 501HDV head provides very smooth motion. That said, there have been several situations where rapid mobility would have allowed me to get to a new location to catch the action missed by a static camera. To that end, a different tripod was needed. Enter, a new combo for 2013, the Manfrotto's MVH502A Pro Fluid Video Head (75mm) w/MVT502AM Telescopic Twin Legs. This tripod is far lighter than the 055XDB and with its center braces allows me to grab and go quickly without much adjustment at the new location. The fluid half ball head permits near instant leveling and the new "Bridge Technology" makes for an overall fluid movement and a lighter rig. I enjoy using both the tripods for very different reasons.
 Next, a new, more capable camera was the order of the day. For compatibility and HD performance on the various shoots, I selected another Panasonic camcorder, the Panasonic AG-AC160A AVCCAM HD Handheld. The Panasonic AG-AC160A AVCCAM HD Handheld Camcorder is an upgraded version of the AG-AC160. The upgrade consists of the addition of 1080/60p and 50p recording (max. 28Mbps in PS mode), expanded focus assist functionality, and a "turbo speed" one-push auto focus function.
Compatibility of accessories, batteries and software utilities were definitely a factor in the selection. HD performance is a step above the AG-HMC80 and with the added SDI features, it provides professional capture in line with Latona Arts and the future configuration at the Museum of Flight. In addition, the 22X optical zoom was just what I needed for those "I can't get that close" assignments on which the 12X zoom in the AG-HMC80 fell short. Another factor was the recording times, the AG-HMC80 has a single SD card slot, on long shoots it required a pause in the recording to change the card. Whereas, AC-160A has dual SD card slots which allow for tandem recording. Unfortunately, it does not allow for hot swapping out a full card during recording, therefore continuous recording is limited to however much fits on the two cards already in the camera. Since two 64GB SD cards provide 12+ hours of un-interrupted HD recording, I am hoping most of the shoots will be under that. However, having two cameras now allows pauses on one while the other covers the action. I guess technically I could shoot continuously as long as I had empty cards to insert.
Next, a new, more capable camera was the order of the day. For compatibility and HD performance on the various shoots, I selected another Panasonic camcorder, the Panasonic AG-AC160A AVCCAM HD Handheld. The Panasonic AG-AC160A AVCCAM HD Handheld Camcorder is an upgraded version of the AG-AC160. The upgrade consists of the addition of 1080/60p and 50p recording (max. 28Mbps in PS mode), expanded focus assist functionality, and a "turbo speed" one-push auto focus function.
Compatibility of accessories, batteries and software utilities were definitely a factor in the selection. HD performance is a step above the AG-HMC80 and with the added SDI features, it provides professional capture in line with Latona Arts and the future configuration at the Museum of Flight. In addition, the 22X optical zoom was just what I needed for those "I can't get that close" assignments on which the 12X zoom in the AG-HMC80 fell short. Another factor was the recording times, the AG-HMC80 has a single SD card slot, on long shoots it required a pause in the recording to change the card. Whereas, AC-160A has dual SD card slots which allow for tandem recording. Unfortunately, it does not allow for hot swapping out a full card during recording, therefore continuous recording is limited to however much fits on the two cards already in the camera. Since two 64GB SD cards provide 12+ hours of un-interrupted HD recording, I am hoping most of the shoots will be under that. However, having two cameras now allows pauses on one while the other covers the action. I guess technically I could shoot continuously as long as I had empty cards to insert.
Overall, I am really pleased with my selection of Panasonic equipment. I won't say that I am a Panasonic fan-boy, but thus far their cameras have definitely delivered. There you have it, always learning, always improving. Here's hoping someone finds this information helpful.
First, since my last post in January, 2012 a lot has happened. I am now working full time for the Museum of Flight in the Seattle area. The work involves a lot of event and exhibit creation, preparation and take down. It also includes the best part, which is the video production. My last post noted some new equipment I purchased for personal use. This personal use has expanded to some gigs as a cameraman for Latona Arts and at times the equipment is also used to supplement event captures at the museum as well.
Here in my studio, we (Arlene & I) were using Sony Vegas Studio to create a variety of videos. In the year and a half since the last equipment purchases a lot of skill progress has been made and it is time to make the next leap in equipment and software. Software will remain in the Sony Vegas line, but now going with Vegas Pro and Sound Forge Pro. We will continue to use DVD Architect, but plan to look at possible improvements there as well.

Since the Rode NTG-1 microphone has worked well, it is on the new equipment list again.
Areas that needed improvement are - carrying cases, tripod and camera. The current cases are okay, but through experience, it is clear that the current tripod case is not rugged enough to protect an expensive tripod. With the newest tripod purchase and a replacement for the older case, Handmade Enterprises Video will be purchasing the Hakuba PSTC 300 Extra Large Pro Series Tripod Case. Large enough and padded enough for the various excursion the tripod will endure.
The next case improvement is to secure one large enough for the new camera and all the extra accessories that must tag along to any shoot. The current case fits the Panasonic AG-HMC80, but isn't as durable as I had hoped. Nothing new for the AG-HMC80, but for the new camera I will purchase the B&H recommended case. The Pearstone Professional Soft Camcorder Case with Wheels is the choice.
 This is a little bit of overkill, but provides ample protection and interior room for camera and many of the accessories that must follow me around. This eliminates the need for many of the secondary cases I was hauling. The wheeled nature of the case now means that I arrive with tripod on the shoulder while pulling the camera case and that's it. Sometimes I still need to bring a cart for a full setup, where a full setup means adding cables, microphones, mixer, recorder and monitor, plus sometimes a lighting kit. May still need a roadie when that happens.
 What holds up your cameras is often as important as the cameras themselves. Previous tripod purchase was the Manfrotto 055XDB Tripod (Black) with 501HDV Head. A very nice tripod for use where having the camera up high (to shoot over the audience's heads) and staying in one location (such as setup on stage or in venues where moving the camera would be too much of a distraction) is the order of the day. It is heavy enough to be stable and with the 501HDV head provides very smooth motion. That said, there have been several situations where rapid mobility would have allowed me to get to a new location to catch the action missed by a static camera. To that end, a different tripod was needed. Enter, a new combo for 2013, the Manfrotto's MVH502A Pro Fluid Video Head (75mm) w/MVT502AM Telescopic Twin Legs. This tripod is far lighter than the 055XDB and with its center braces allows me to grab and go quickly without much adjustment at the new location. The fluid half ball head permits near instant leveling and the new "Bridge Technology" makes for an overall fluid movement and a lighter rig. I enjoy using both the tripods for very different reasons.
 Next, a new, more capable camera was the order of the day. For compatibility and HD performance on the various shoots, I selected another Panasonic camcorder, the Panasonic AG-AC160A AVCCAM HD Handheld. The Panasonic AG-AC160A AVCCAM HD Handheld Camcorder is an upgraded version of the AG-AC160. The upgrade consists of the addition of 1080/60p and 50p recording (max. 28Mbps in PS mode), expanded focus assist functionality, and a "turbo speed" one-push auto focus function.
Compatibility of accessories, batteries and software utilities were definitely a factor in the selection. HD performance is a step above the AG-HMC80 and with the added SDI features, it provides professional capture in line with Latona Arts and the future configuration at the Museum of Flight. In addition, the 22X optical zoom was just what I needed for those "I can't get that close" assignments on which the 12X zoom in the AG-HMC80 fell short. Another factor was the recording times, the AG-HMC80 has a single SD card slot, on long shoots it required a pause in the recording to change the card. Whereas, AC-160A has dual SD card slots which allow for tandem recording. Unfortunately, it does not allow for hot swapping out a full card during recording, therefore continuous recording is limited to however much fits on the two cards already in the camera. Since two 64GB SD cards provide 12+ hours of un-interrupted HD recording, I am hoping most of the shoots will be under that. However, having two cameras now allows pauses on one while the other covers the action. I guess technically I could shoot continuously as long as I had empty cards to insert.
Next, a new, more capable camera was the order of the day. For compatibility and HD performance on the various shoots, I selected another Panasonic camcorder, the Panasonic AG-AC160A AVCCAM HD Handheld. The Panasonic AG-AC160A AVCCAM HD Handheld Camcorder is an upgraded version of the AG-AC160. The upgrade consists of the addition of 1080/60p and 50p recording (max. 28Mbps in PS mode), expanded focus assist functionality, and a "turbo speed" one-push auto focus function.
Compatibility of accessories, batteries and software utilities were definitely a factor in the selection. HD performance is a step above the AG-HMC80 and with the added SDI features, it provides professional capture in line with Latona Arts and the future configuration at the Museum of Flight. In addition, the 22X optical zoom was just what I needed for those "I can't get that close" assignments on which the 12X zoom in the AG-HMC80 fell short. Another factor was the recording times, the AG-HMC80 has a single SD card slot, on long shoots it required a pause in the recording to change the card. Whereas, AC-160A has dual SD card slots which allow for tandem recording. Unfortunately, it does not allow for hot swapping out a full card during recording, therefore continuous recording is limited to however much fits on the two cards already in the camera. Since two 64GB SD cards provide 12+ hours of un-interrupted HD recording, I am hoping most of the shoots will be under that. However, having two cameras now allows pauses on one while the other covers the action. I guess technically I could shoot continuously as long as I had empty cards to insert.Overall, I am really pleased with my selection of Panasonic equipment. I won't say that I am a Panasonic fan-boy, but thus far their cameras have definitely delivered. There you have it, always learning, always improving. Here's hoping someone finds this information helpful.
Saturday, January 14, 2012
Getting serious about this video thing.
Recently, decided to get a bit more serious about this video thing. Up until now I have been using the normal consumer grade camcorders: a Panasonic GS-150 (my first) is still a convenient small standard definition and a Canon HV20 Hi-Def was my last jump up. Added some accessories like a Rode VideoMic, Azden wireless mic and a small light for the Canon. My editing/production was done on Adobe Creative Suite.
Well, I have been volunteering and now employed part-time with the Seattle Museum of Flight (MOF). I do video production work. His means I am a camera operator and perform video editing with the final result being DVDs for use and archival at MOF. This effort got me to move to new editing software. First, I purchased for home the Sony Vegas Movie Studio Suite. Excellent choice but I soon found some limitations as my efforts became more complex. Recently (through November 2011) Sony had an excellent upgrade path from Movie Studio to Sony Vegas Pro 11. I am still using the sound and DVD production from the Movie Studio Suite.
One of my last projects at MOF was a series of interviews using a High Definition camera and that led me to my next set of purchases.
One brief personal note. Arlene and I are two of a kind when it comes to our projects and hobbies. We commit! I mean we give it our best shot and enjoy the learning of new skills and crafts. That said, you may now understand why the following list of equipment was perfect for the projects I have planned.
Finding B&H Photo and Video online was probably not a great thing for my wallet. Not because they are expensive, which they aren't. As a matter of fact they have a great selection, very good prices, knowledgeable staff and have been the most reliable online purchase experience to date. Which is saying a lot since I had been purchasing quite a bit from Amazon.com.
Okay, here is what I got. First the camera selection. I wanted something that was bigger than the small consumer camcorders I already owned, yet light enough to shoot for long periods. Enough features so I wouldn't be missing some key thing down the road. And of course, it needed to be within my limited, non-professional sized budget.
 These requirements led me to the Panasonic AG-HMC80 shoulder mount HD camera. What I like about it is the professional features but it was one of the lower cost cameras I investigated. It records to SDHC cards (can't use the newer SDXC cards), which is moving me away from tape. Not sure how I feel about that, but one advantage is that moving the clips from the camera to computer doesn't involve replaying the shoot in real-time to capture from tape. Major, major advantage.
Next, I moved on to the extras.
Now, I need something to carrying everything. Looking at the following cases:
Overall, I'm quite pleased with the combination. Fortunately, I was able to get rebates on the Manfrotto tripod and head, camera had a special price while the rest were all the normal B&H low prices. The projects are interviews, events, documentaries and whatever might come up. I guess time will tell if these were all the right choices. So far, so good.
Well, I have been volunteering and now employed part-time with the Seattle Museum of Flight (MOF). I do video production work. His means I am a camera operator and perform video editing with the final result being DVDs for use and archival at MOF. This effort got me to move to new editing software. First, I purchased for home the Sony Vegas Movie Studio Suite. Excellent choice but I soon found some limitations as my efforts became more complex. Recently (through November 2011) Sony had an excellent upgrade path from Movie Studio to Sony Vegas Pro 11. I am still using the sound and DVD production from the Movie Studio Suite.
One of my last projects at MOF was a series of interviews using a High Definition camera and that led me to my next set of purchases.
One brief personal note. Arlene and I are two of a kind when it comes to our projects and hobbies. We commit! I mean we give it our best shot and enjoy the learning of new skills and crafts. That said, you may now understand why the following list of equipment was perfect for the projects I have planned.
Finding B&H Photo and Video online was probably not a great thing for my wallet. Not because they are expensive, which they aren't. As a matter of fact they have a great selection, very good prices, knowledgeable staff and have been the most reliable online purchase experience to date. Which is saying a lot since I had been purchasing quite a bit from Amazon.com.
Okay, here is what I got. First the camera selection. I wanted something that was bigger than the small consumer camcorders I already owned, yet light enough to shoot for long periods. Enough features so I wouldn't be missing some key thing down the road. And of course, it needed to be within my limited, non-professional sized budget.
Next, I moved on to the extras.
- Manfrotto 055XDB Tripod (Black) with 501HDV Head

- Panasonic VW-VBG6 Rechargeable Li-Ion Battery

- Rode NTG-1 Condenser Shotgun Microphone Kit

- Panasonic Rock-DVX-ZFI Zoom/Focus/Iris Rocker Controller

Now, I need something to carrying everything. Looking at the following cases:


Overall, I'm quite pleased with the combination. Fortunately, I was able to get rebates on the Manfrotto tripod and head, camera had a special price while the rest were all the normal B&H low prices. The projects are interviews, events, documentaries and whatever might come up. I guess time will tell if these were all the right choices. So far, so good.
Subscribe to:
Posts (Atom)

